Find Food!

Saturday 15 December 2012

Christmas Special Weekend - Part Two: Mince Pies

My family and work colleague can confirm for you if you need a reference, that these mince pies are quite simply the best mince pies you will ever have in your life.

Ingredients:
140g Cold butter, diced
225g Plain flour
50g Ground almonds
50g Golden caster sugar
280g Mincemeat
1 x Clementine or Orange, zest only
1x Pinch of salt
1 x Egg yolk
5 x Tbsp cold water
1 x Egg, beaten
Icing sugar for dusting

Step 1.
You need to massage the butter into the flour so it goes quite flaky. I do this with my hands rather then allow a machine to do it. Once all the butter is smushed into the flour and everything is covered, pour in the almonds, caster sugar, orange or clementine rind and salt until the mixture is much more crumbly than before.

Step 2.
Separate your egg from the white and pour in the egg yolk and the water. Stop rubbing the mixture between your fingers now and start moulding it with your whole hand, making sure everything is covered in the egg and water until you can eventually mould it into a round soft sticky ball. You will then need to wrap it in some clingfilm and whack it in the fridge for 20 - 30 minutes. In the last 5 minutes of the chilling process, preheat the oven to 200 degrees C, grease the cupcake tins and clear a decent work station to roll out the dough.
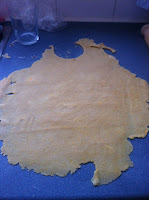
Step 3. Start by pouring some plain flour onto the work top. Take your dough out and place it into the middle of that pile of flour and add some more on top of dough. You have to start kneading the dough and putting more flour onto to any really sticky bits. Eventually you will have a proper soft dough that is very easily roll out-able. Roll out the pastry to a thickness of about 2-3mm and cut out about 12-15 rounds with a pastry cutter.

Step 4.
Put the cut outs into the cupcake tray and teaspoon 1 and a half teaspoons of mincemeat into them. Be careful with the spoon not to rip the pastry and feel free to lick it in between pies.. just don't let anyone see you do that. Germs and what have you. I've never done that.... honest. Now roll the left over pastry out and with a smaller glass cut out some lids. Place them over the mincemeat and then with fingertips, squeeze the main pastry with the lid pastry together. Then gently poke a sharp knife through the centre of the lids.


Step 5.With some egg yolk that has been lightly whisked, brush the top of the pies and then simply put them in the oven. They take out 15-20 minutes maximum and take around 10 minutes to cool down properly enough to eat. Dust with some icing sugar if you fancy but I didn't seem to need to.


Christmas Special Weekend - Part One: Mulled Wine

Well people. It is Christmas! And nothing smells, tastes or induces decent alcohol poisoning like a good mulled wine.And here is how to do it.

Other ingredients for other Christmas things included
Ingredients:
2 x Clementines
1 x Peel of a lemon
1 x Peel of a lime 
250g Caster sugar
1 x Hand full of soft brown sugar
6 x Whole cloves
1 x Cinnamon stick
3 x Bay leaves
1tbsp Ground nutmeg
1 x Whole vanilla pod, halved
2 x Star anise 
2 x Bottles of red wine

Step 1.
Start by hand peeling large sections off the fruit over the an at least 2 litre pan, not on the hob at this point. Once done, pour in the caster sugar NOT THE BROWN, and then squeeze the juice out of the clementines. Put it on the hob at full temperature.

Step 2.
Add the cloves, cinnamon stick, bay leaves and the nutmeg to the mixture. Throw in your halved vanilla pod and then top it all with just enough red wine to cover the ingredients. Let this simmer until the sugar has completely dissolved into the red wine and then bring to the boil. Keep on a rolling boil for about 4 minutes then you need to add the brown sugar. You should then turn down the heat really low to keep it warm but definitely not boiling.. boiling makes the alcohol disappear and you do NOT want that.

Step 3.
Once the brown sugar is in, the red wine should have become more of a thick syrup. You are more than welcome to add some more sugar if you want it very very sweet but I can confirm this recipe is already for a quite sweet mulled wine. Once the pan is no longer boiling and it just vapour making warm, add the star anise and the rest of the two bottles of wine. Keep heating for around 5 minutes.. taking sips to see if it is warm enough (at least that's your excuse) and when you are happy with the temperature, go to step four.

Step 4.
Drink it. Make sure you check out how to make mince pies in the Christmas Weekend Special blog Part Two.
Merry Christmas!!


Very nice
This is what happens after too much....


Thursday 8 November 2012

Brie and Roasted Vegetable Tart

No I didn't roast a mini skirt wearer - I made a pastry tart! And it was BEYOND fabulous. Here is how...

Ingredients:
1 x Courgette, sliced
2 x Peppers, diced into chunks (I picked yellow and red)
10 x Cherry tomatoes
1 x Red and white onions
50g Spinach
100g Brie
200g Plain flour
75g White vegetable fat
50g Cheddar cheese
1 x Egg, beaten

Step 1. We roast the veggies first so make them all chunky and bohemian-esk and mix them all up into a roasting dish. Have the oven pre-heated to 200 C and cover - not drown - them in a bit of nice olive oil. Sprinkle some salt and pepper on to taste and stick them in the oven. Clear some room.. the pastry is a comin'!

Step 2. PASTRY! God I love pastry.. Anyway. If you have a blender then wonderful. I am jealous of you.. I used a fork and a litre of sweat. Blend together the flour, a pinch of salt, the fat and the cheese. Once thoroughly mixed together, add 3 tablespoons of the egg you have pre beaten (poor egg, what did it do to you) and add some cold water. I put in about a tumbler glass worth steadily and not all at once. What you are aiming for is a smooth as you can get dough that isn't sticky. Once done, take it out of the blender and knead it gently for a few minutes. Wrap some cling film around it and chuck it into the fridge for 15 minutes. Go and stir the veg around.

Step 3. Take out your veg and pastry at the same time, being careful not to drool into either. Put down some more plain flour and unwrap your dough onto it. Putting a bit of flour into each of the wet sticky bits, roll out the dough until it fits your baking tray with enough to flap over the sides. With the left over beaten egg, bush the rolled out ready dough with it and then fill in the middle of the baking tray with the veg. Permission to now go nuts with the brie. Do it lavishly. Stick it everywhere! 

Step 4. Turn the sides of the tart up to make a brie and roasted vegetable nest. Return the glorious concoction to the oven and give it 25 minutes. Go back every 5 minutes to watch it rise and when the buzzer buzzes or the dinger dings, take it out and go and show the neighbours. And then enjoy it alone.. in a dark room.. alone.. kali orexi!

Tuesday 6 November 2012

Snowed in the Hole

Ello ducky! 'Ow do? Today I bring you a good ol' English favourite - toad in the hole, but with a twist! I have made a yorkshire pudding batter, poured it over grilled sausages and then once the pudding was done, I have topped it with mash and grilled it. Hence the snowed in bit.. what with mash being white. This makes enough for 12 sausages so you either need A FUCK off baking tray or you need to spread it into two.

Ingredients:
12 x Good sausages
8 x Very large white potatoes
1 x Tbsp of vegetable oil
4 x Eggs, beaten
225g Plain flour
250ml Semi skimmed milk
Choice of veggies - as many as you want
Salt and Pepper to taste

Step 1. Put the sausages under the grill making sure they are nice and cooked on all sides, unless you want the shits for undercooked pork. I don't.

Step 2. Batter making time. Put the oven onto around 200-230 degree C (not a fan oven) and start by putting the flour and salt into the mixing bowl. Beat the eggs (with a fork or whisk or baseball bat) and mix in the milk. Once all nice and blended, pour it over the flour and beat that up too. Once it is very nice and silky, leave it to one side to "rest", because clearly it's had it hard lately.

Step 3. Put the oil into the baking trays and put them on their own into the oven. Only when the trays are SMOKINGLY (literally) hot, should you transfer the sausages into them and pour over the batter. Put them into the oven and then do NOT touch them or go near the oven until they have risen and are golden brown. You will have to look through the oven window or something because if I catch you opening the oven door for a peek.... There might be a burning accident....

Step 4. Make the potatoes and vegetables. Easy done this - peel the potatoes and put them in water, same with veg. Put pan of water with items onto hob. Turn hob on. Wait until items are soft. DONE! People like their mash differently so do it as you would. Surely everyone has made mash before and you don't need step by step?!

Step 5. By now the sausage and pudding should be done. Top the pudding with the vegies and then the mash. Bung it under the grill and people it's done! I served mine with a gravy and I can tell you it went down SO well. Everyone loved it and it is incredibly filling.Have fun making it yourself!


Monday 5 November 2012

Pizza Rowlandez

A lavishly, gorgeously rich pizza that took 10 minutes to make and 10 minutes to cook. Knowing what ingredients are going on and in the pizza makes it worth while. This recipe makes 2 pizzas.

Ingredients:
1 x 2 pack of pizza bases
1 x Red onion
1 x Red pepper
1 x Slice of goats cheese
1 x Bag of spinach
1 x Jar of tomato pizza sauce
1 x Pack of tikka chicken strips

Step 1. Make sure the pizza bases are defrosted if they were in the freezer. Nothing worse than a soggy pizza coming out of the oven! I start by slicing the onion, pepper and spinach. I make the spinach quite thin and the onion I cut into rings. Now I like my peppers chunky so that's what I did but you do them how you fancy.
  
Step 2. Layer on a relatively thick spread of the pizza tomato sauce onto the bases. I LOVE a tomato pizza so I actually added some tomato paste - of course you could use sundried tomatos or something. I like how strong the pastes can taste.


Step 3. Apply the toppings! Spinach first sprinkled all over the base, then red onions, then peppers. At this point its time to apply the goats cheese. Split the pack into two so you have even amounts for the two bases and with your fingers (because its more fun and you can lick them afterwards) tear off globs of it and dot them all around, nice and spread out and ideally into sections where you might cut up a slice. You want at least one glob on each slice. Then liberally apply your chicken! I like mine symetrically applied like a star.. but I do have OCD. Next grate some harder cheese on - I used lactofree because otherwise I would explode and die.  

Step 4. OVEN! If you are making two at the same time then I would say put them in for 7 minutes, then rotate for another 7 minutes. They should come out beautiful and toasty. And it WILL be the best pizza you have ever eaten. SO GOOD! Buon Appetito!

Sunday 4 November 2012

Healthy Blueberry and Vanilla Yogurt Muffins

These are my healthy blueberry muffins that I like to make in bulk and freeze for breakfasts. My recipe makes 30 decent sized muffins are are round about 101 Calories and 3g Fat.

Ingredients:
750g Self Raising Flour
375g Golden Caster Sugar
3 tsp Bicarbonate of Soda
375g Blueberries
6 Medium eggs
9 tbsp Vegetable Oil
300ml Skimmed milk
375g Vanilla fat free yogurt
120g Natural yogurt

Step 1. Get t'oven on! Crank it up to 200c (this is not a fan oven) and put your muffin cases into the muffin cases holder thing, find your weighing scales and get two mixing bowls on the go. And the sieve (not the colander like I did first time... I was tired)

Step 2. Sieve the flour and bicarbonate of soda into a mixing bowl, give it a gentle swish around before adding in the caster sugar & blueberries. Mix it all together until you have an evenly dispersed amount of blueberries.

Step 3. In a really big measuring jug pour the milk in and mix in the oil. Once that is nice and blended in, pour in the yogurts and splodge in the eggs. Using a fork mix the ingredients together.

Step 4. Separate the flour mixture so there is a hole in the middle of it and pour in your jug. Then really gently, fold in the flour around it until you eventually get a nice gooey bowl of goodness.

Step 5. Spoon your mixture into the muffin cases making sure there is a teeny wee bit of room at the top for the muffin to rise and spill over just a little bit. Not too much.. just a bit.

Step 6. Oven time. I find in my oven they take 20 minutes but I know in fan ovens it can take just 10. If like mine it takes 20 minutes, after the initial 10 mins alternate the trays. The best way to tell if they are done is to poke a cocktail stick into them and if they come out wet or sticky then they need more time. Obviously if they are turning black on top then take them out!!

Step 7. Put them on a cooling tray and leave them be for 10 minutes. Once done, dust with icing sugar and enjoy! As I said, I freeze them so to defrost take them out the night before and pop in the fridge. Heated up in the morning with a sneaky bit of butter makes them completely amazing if they weren't already.

Enjoy!


Wednesday 17 October 2012

Mexican Chicken Lasagna

Good evening all, what did you have for tea? I had a Mexican Chicken Lasagna and it was AMAZINNGGG!!!
Forgot to do a pre-open shot

Ingredients:
3 x Skinless chicken breasts
1 x Discovery Fajita sauce
1 x Soured cream (small pot from Tesco)
1 x Tesco's own guacamole
2 x Torilla wraps
1 x Bag of corn chips
1 x Bag of mixed peppers
1 x White and Red onions
2 Tablespoons of tomato paste
1 x Lactofree cheese
3 Tablespoon of sweet chili sauce

Step 1. Dice that chicken! I did mine into nice big but thinnish slices so they sat like layers and not massive chunks. Chuck it in an already hot and oiled pan and flip it until all sides are nice and white and starting to brown up. You have time to do the onions whilst it's cooking - the pan should be on full heat by the way.

Step 2. Once the onions have been nicely chopped, again nice and thinly so they will lie easily in a relaxed lasagna like way, pour them over the chicken and turn the heat down a wee bit because you don't want the onions to cook too quickly - it also gives you time to chop the peppers whilst they sweat away. Make sure the peppers are cut straight like the chicken and stick them in when they're done. The heat can go right back up now - cook everything and mix everything nicely for around 4 minutes. 

Step 3. Squeeze in some tomato paste and give it a stir. For me, the tomato paste is as much as you want really. I only really use it because it makes the dry fajita mix stick better. Once that's done, pour on the dry fajita mix you get with Discovery and the sauce making sure everything in the pan is covered. Then add sweet chili - I have suggested 3 tablespoons but if you to add more go for it! 

Step 4. Your pan should look like the picture to the left! AMAZING. It will also smell of actual Mexican heaven - I wish I had been wearing my sombrero. Sigh. Anyway! The next important step is put this to one side and find the tortilla wraps and grab a deep dish bowl or, as I used and find extremely effective, a very deep cake tin. Put your tortilla in the bottom and smooth it out against the sides if it reaches them. Get the soured cream and the guacamole and start splodging it in. It doesn't have to be too much at this stage, just a few blobs on each in the middle and then spread with a knife. Take pride in what you have started, for this friends, this is the base of a mouthgasm.

Step 5. Is all about layering. Once you have stopped grinning as your first ever Mexican lasagna base, spoon/ladle/scoop with hands some of the chiken fajita, making sure the tortilla is covered and patted down.

OH the HUMANITY!!
Ooooooooh... Ooooohhh
Step 6. Open the bag of corn chips. Sprinkle them with love and form a pretty and even layer of them on top of your chicken. Then add another tortilla and RELISH in the pleasure of applying your second layer.. because it only gets good from here. Do exactly what you did in step 4 and 5. Then when the chicken is on, take that bag of corn chips back off the greedy husband/wife/passing rouge and throw all caution to the wind. Throw on those chips with a recklessness not seen in a kitchen since Jesus turned water into wine (seriously what was Des going to go about getting everyone home if there was no water left?? Careless disregard). Once satisfied and almost out of breath from your daring corn chip escapade, relocate what is left of the soured cream and guacamole and sploge until there is no more splodge to make. And then... to dramatic music you have on your iPod ready and waiting, grate... the... CHEESE.

Step 7. Oven. 180 degrees C already pre-heated. And take a seat. Make sure Corrie or Stenders or Emmerdale isn't on when you're doing this because you don't want to miss watching the tips of the corn chips (ooh rhyming) browning, the cheese bubbling or the lovingly blobbed on blobs of sourced cream and guacamole melt into the craggy gaps into the steaming fajita medley underneath. Watch for 15 minutes.. with a bib.

Step 8. Release the beast. Take a spatula and a sharp knife and delve. Wait for no one and nothing. And for the love of Allah, enjoy it! Or as the Spanish would say - disfrutar!


Monday 15 October 2012

Salmon with Red Pepper and Butternut Squash Stir Fry

My first tea post!! I had a salmon fillet with a red pepper and butternut squash stir fry, mixed with fresh egg noodles and sweet chilli sauce.


Ingredients:
1 x The Saucy Fish Co. Salmon fillet with a chilli, lime and ginger dressing (available from Tesco for £4.00)
1 x Chunky Pepper and butternut squash stiry fry mix (Tesco Finest range for £2.00)
1 x Fresh Egg Noodles (available from Tesco for £1.00)
20ml of oil - I think any,
Optional: Extra sweet chilli sauce

Step 1. Liberate the fish! And whilst you are wrestling with the vaccum packaging that holds the salmon with an unforgiving suck, heat a few squirts of oil in a non stick frying pan. Once the fish is finally free and you have wiped your brow and apologised to the kids for screaming "you bollocksing twat head!!", make sure the pan is set to a medium heat and place the fish skinside down. Every 4 minutes turn it onto a different side so in 16 minutes time, all 4 sides have been cooked.

Step 2. Let the fish rest on the side (because it's clearly worked so hard) and chuck in the vegetables making sure you don't throw in the leaf. Toss and cook these for around 5 minutes on full heat now. Once that's done you can now put the leaf in for 1 minute. Let it wilt and go all floppy (yes I am still talking about the leaf).

Step 3. Chuck the wonderfully colourful aray of vegetables in a bowl and lob in the salmon. Give it a good forking - snigger.

Step 4. Add 15ml of oil into the frying pan you were using and slodge in the noodles. Now this is important.. NEVER STOP STIRRING!! EVER!! for the next 5 minutes. After 5 minutes, allow the eggy noddley goodness to join the most colourful bowl you have ever seen and
give it another good forking - snigger.

Step 5. Add the sweet chilli mix they gave you with the fish. If it isn't enough, or you're just a mega fan of the sweet chilli, then pour some more in. As much as you want really but try not to overdo it so you can still taste the salmon.

Step 6. Eat it! Dish it up into two bowls and save a wee bit for a lunch tomorrow. Enjoy it and if you have any suggestions for a twist on this idea then please comment below.

Fin. (see what I did there?? It means finished but also, fish have fins!! God I'm amusing.)


Mission Statement

Good afternoon food people, or bored and just surfing people. Or just people.

I am one of you and I am also someone who loves food but is stuck in the endless "what shall we have for tea?" before deciding on the same thing every time; "sausage and mash".

So I am here in order to push myself into eating something new as often as I can, or putting a new spin on an already made thing - like sausage and mash but add leaks and mustard and then we don't have just normal mash eh!

I might not do a tea one sometimes, I might do a cake or a flapjack, or maybe a breakfast. I could possibly do a lunch who knows!! But what I can promise is I will put up a picture of the finished product, maybe a couple of prep pics and most definitely, I will put up a list of ingredients and a step by step.

Tonights dinner is going to be salmon thai pepper stir fry - I may also attempt to make all my tea's rhyme. See you later with results!!